AWWW Switcher (Vicinae Extension)
Pick a wallpaper from a grid and apply with awww with a transition of your choosing. You can even generate a color palette from the wallpaper!
Dont feel like picking a wallpaper? Just run Random Wallpaper!
Features
- Choose a path in extension settings
- Grid layout of images in the path
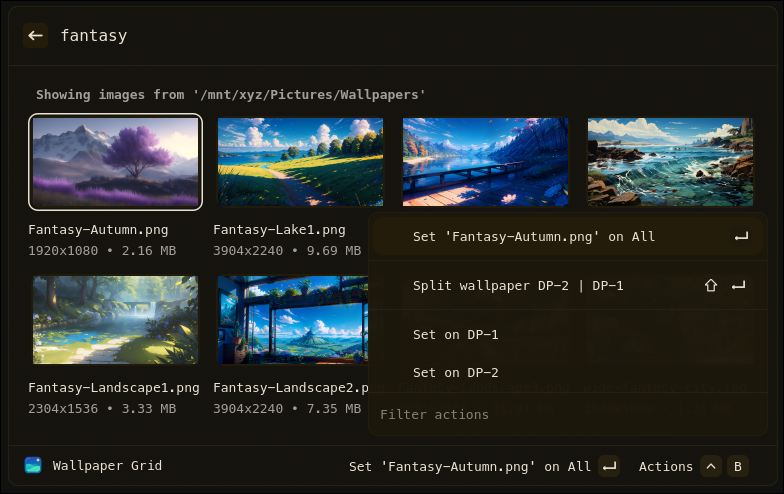
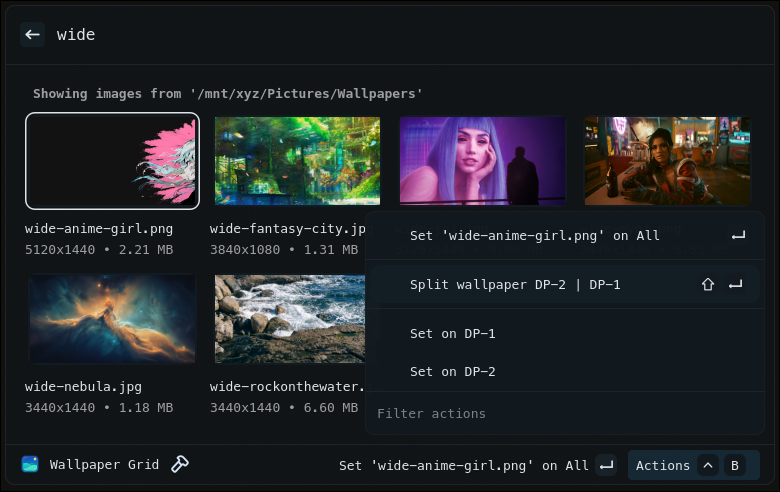
- One-tap to set wallpaper via
awwwon all or a single monitor- Split one images into multiple wallpapers with ImageMagick
- Add a sweet awww transition, configure the duration and steps too
- Add a color generator to run on the image
- Use Imagemagick to blur, grayscale, negate the selected image for a lock screen, etc...
- Set a random wallpaper.
Requirements
- Linux with Hyprland
- vicinae v0.12.2 or higher
- awww
- Images in one of: jpg, jpeg, png, webp, gif
- Optional: Color generator like matugen
- Optional: ImageMagick for splitting one image in half for two wallpapers or for post processing like blur
Commands
Wallpaper grid— Open the wallpaper browser and set a wallpaperRandom Wallpaper— Randomly apply a wallpaper
Extension Preferences
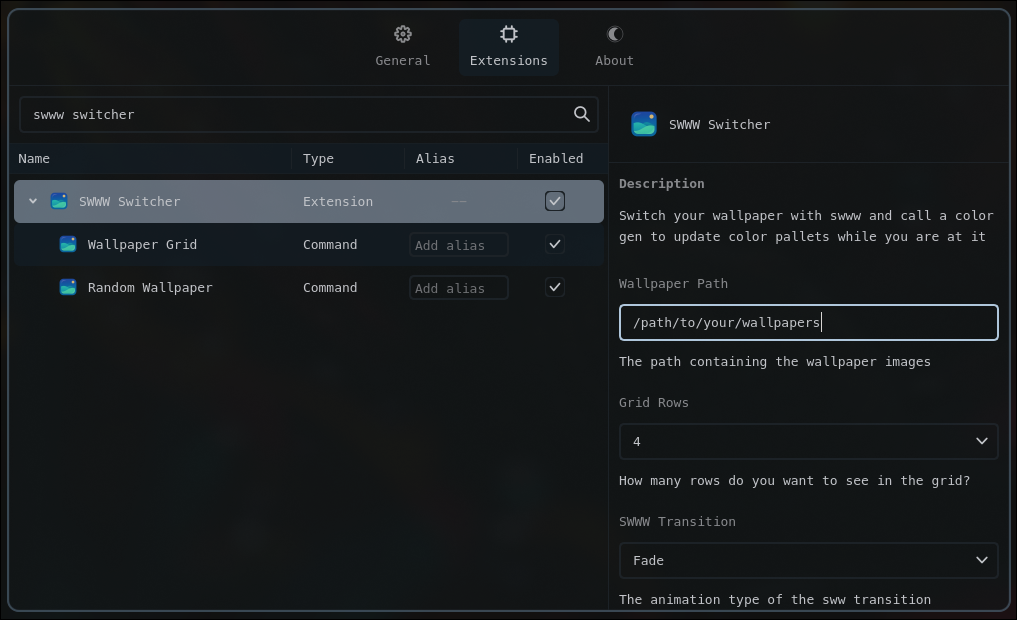
- Wallpaper Path
- AWWW Transition Type
- Default =
random
- Default =
- AWWW Duration (In seconds)
- Default =
3
- Default =
- AWWW Transition Step
- Default =
90
- Default =
- AWWW Transition FPS
- Default =
60
- Default =
- Color Generator
- Default =
none
- Default =
- Grid Rows
- Default =
4
- Default =
- Toggle Vicinae on Selection
- Default =
true
- Default =
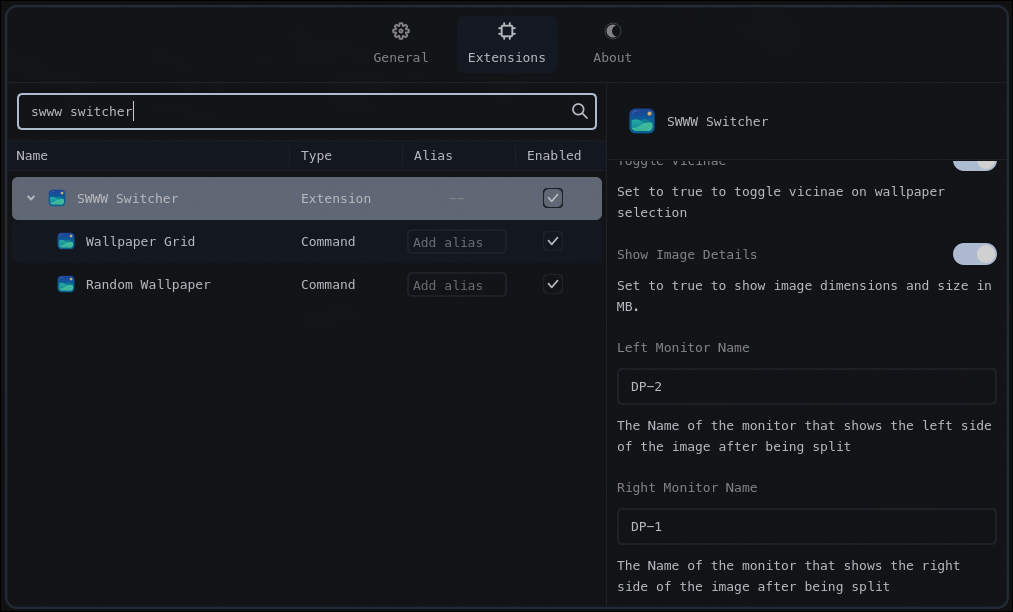
- Show Image Details
- Default =
true
- Default =
- ImageMagick Post-Production
- Default =
none
- Default =
- leftmonitor
- Default =
unset
- Default =
- rightmonitor
- Default =
unset
- Default =
Quick start (development)
npm install
npm run dev
This starts the extension in Vicinae dev mode. Follow Vicinae’s docs for how to connect a dev extension if needed.
Build (production)
npm run build
This produces a production bundle that can be distributed/installed per Vicinae guidelines.
First Usage
-
Launch
wallpaper grid -
Set the path to your images.
-
Search or scroll for that perfect image, then choose “Set” to apply it to all monitors. Go into the menu to apply it to only one monitor.
-
Change extension settings to suit your needs.
Add this extension to your Hyprland config
This is how I have added this extension to my keybindings file:
bind = SUPER CTRL, W, exec, vicinae vicinae://launch/@sovereign/awww-switcher/wpgrid
bind = SUPER SHIFT, W, exec, vicinae vicinae://launch/@sovereign/awww-switcher/wprandom
AWWW Transitions
The folowing tranistions are supported:
- Simple
- Fade
- Left
- Right
- Top
- Bottom
- Wipe
- Wave
- Grow
- Center
- Any
- Outer
- Random
AWWW Steps and Duration
You can select the duration in seconds using the AWWW Duration (In seconds) dropdown in the extension preferences. You can select 1,2,3,5 and 8 seconds.
You can select the step using the AWWW Transition Step dropdown in the extension preferences. You have as fast as instant and the slowest possible.
Color Generator:
Use a tool to pull colors out of a wallpaper for themeing purposes. Below is a list of tools supported:
I use Matugen, BTW
- Color generator tools like Matugen will need to be set up independently of this Extension. I will provide my matugen files to get you started.
Base of this theme provided by the amazing Sridou. Check the offical documentation for more!
- Save a template file where ever you'd like. Example below.
# Vicinae Matugen Theme for awww switcher

[meta]
name = "Matugen"
description = "Changes color when the wallpaper does. It's a follower. {{mode}} variant"
variant = "{{mode}}"
icon = "icons/matugen.png"

# ============================================================================
# Core Colors
# ============================================================================

[colors.core]
accent = "{{colors.primary.default.hex}}"
accent_foreground = "{{colors.background.default.hex}}"
background = "{{colors.background.default.hex}}"
foreground = "{{colors.on_background.default.hex}}"
secondary_background = "{{colors.surface_container_low.default.hex}}"
border = "{{colors.outline_variant.default.hex}}"

# ============================================================================
# Window-Specific Colors
# ============================================================================

[colors.main_window]
border = "{{colors.outline_variant.default.hex}}"

[colors.settings_window]
border = "{{colors.outline.default.hex}}"

# ============================================================================
# Accent Colors
# ============================================================================

[colors.accents]
blue = "{{colors.primary.default.hex}}"
green = "{{colors.tertiary.default.hex}}"
magenta = "{{colors.secondary.default.hex}}"
orange = "{{colors.error.default.hex}}"
red = "{{colors.error.default.hex}}"
yellow = "{{colors.tertiary.default.hex}}"
cyan = "{{colors.primary.default.hex}}"
purple = "{{colors.secondary.default.hex}}"

# ============================================================================
# Text Colors
# ============================================================================

[colors.text]
default = "{{colors.on_surface.default.hex}}"
muted = "{{colors.on_surface_variant.default.hex}}"
danger = "{{colors.error.default.hex}}"
success = "{{colors.tertiary.default.hex}}"
placeholder = "{{colors.on_surface_variant.default.hex}}"

[colors.text.selection]
background = "{{colors.primary.default.hex}}"
foreground = "{{colors.on_primary.default.hex}}"

[colors.text.links]
default = "{{colors.primary.default.hex}}"
visited = "{{colors.secondary.default.hex}}"

# ============================================================================
# Input Fields
# ============================================================================

[colors.input]
border = "{{colors.outline.default.hex}}"
border_focus = "{{colors.primary.default.hex}}"
border_error = "{{colors.error.default.hex}}"

# ============================================================================
# Buttons
# ============================================================================

[colors.button.primary]
background = "{{colors.on_secondary.default.hex}}"
foreground = "{{colors.background.default.hex}}"

[colors.button.primary.hover]
background = { name = "{{colors.surface_container_highest.default.hex}}", opacity = 0.85 }

[colors.button.primary.focus]
outline = "colors.core.accent"

# ============================================================================
# Lists
# ============================================================================

[colors.list.item.hover]
background = { name = "{{colors.on_secondary.default.hex}}", opacity = 0.25  }
foreground = "{{colors.background.default.hex}}"

[colors.list.item.selection]
background = { name = "{{colors.on_primary_container.default.hex}}", opacity = 0.5 }
foreground = "{{colors.background.default.hex}}"
secondary_background = "{{colors.on_secondary.default.hex}}"
secondary_foreground = "{{colors.background.default.hex}}"

# ============================================================================
# Grid Items
# ============================================================================

[colors.grid.item]
background = "{{colors.background.default.hex}}"

[colors.grid.item.hover]
outline = { name = "{{colors.primary.default.hex}}", opacity = 0.6 }

[colors.grid.item.selection]
outline = { name = "{{colors.primary.default.hex}}", opacity = 0.9 }

# ============================================================================
# Scrollbars
# ============================================================================

[colors.scrollbars]
background = { name = "{{colors.on_surface.default.hex}}", opacity = 0.2 }

# ============================================================================
# Loading Indicators
# ============================================================================

[colors.loading]
bar = "{{colors.primary.default.hex}}"
spinner = "{{colors.primary.default.hex}}"
- Call Template File from the matugen config.toml
[templates.vicinae]
input_path = '~/.config/matugen/templates/vicinae.toml'
output_path = '~/.local/share/vicinae/themes/matugen.toml'
post_hook = 'vicinae theme set matugen'
- Note the post hook. That's how you get Vicinae to apply the new theme.
Split One Wallpaper for Two Monitors
- If you set
Left Monitor NameandRight Monitor Namein the extension preferences, you can split the image in half.- The names must be present in the
hyprctl monitors -jarray for the action to appear.
- The names must be present in the
Did you know?
Random Wallpaper can apply one image to multiple monitors if you set Left Monitor Name and Right Monitor Name in the extension preferences, and the ratio betwen the width and height of the image is greater then 1.8!
ImageMagick Post-Production
If you want to use ImageMagick to 'post-process' your selected image, like blur, black and white, or negate then select from the prebuilts under ImageMagick Post-Production in the extension preferences dropdown menu!
- Gray Scale
- Gray Scale + Blur
- Gray Scale + Heavy Blur
- Blur
- Blur + Darken
- Heavy Blur
- Heavy Blur + Darken
- Negate
This will save the processed image to ~/.cache/vicinae/awww-switcher/postprod.jpg which you can use as a wallpaper for rofi, lock screen, login screen, etc...
Post Commands
If you want to run a command or even a script after setting a new wallpaper, you can use the Post Command option in the extension preferences dropdown menu! Add the placeholder ${wallpaper} and it will replace it with the path to the new wallpaper!
- Example:
notify-send "Wallpaper changed to ${wallpaper}"
License
MIT
Thank you
-
I took code from lmm1ng and schromp for this project. They helped me learn how to make an extension for Vicinae. Thank you!
-
Shout out to RodsonMatos for adding wallust support to the Extension! Thank you!